

Connecting Informatica Intelligent Cloud Services (IICS/IDMC), and Snowflake is one of the most common data integration setups used by organizations today. Whether you’re building ETL pipelines, migrating CRM data, or enabling analytics, this integration allows a seamless flow of information across platforms.
If you’re using the Informatica Free Trial, the connection setup is slightly different because Informatica now shows a New Connector Selection Window.
This tutorial provides an easy, beginner-friendly, step-by-step guide to establishing a full Salesforce-to-Informatica-to-Snowflake connection.
Step-by-Step Tutorial: Salesforce + Informatica Free Trial + Snowflake Connection
Part 1: Enable Connectors in Informatica Free Trial
When you first log into the Informatica Cloud Free Trial, some connectors (including Snowflake) may not be immediately available. You must enable them from the Admin Console.
Step 1: Go to the Admin Console
- Log in to Informatica Intelligent Cloud Services (IDMC).
- On the top-right, click on your Account/Org Name.
- Select Admin Console.
Step 2: Navigate to Add-On Connectors
- Inside Admin Console, go to:
Add-On Connectors - A list of available trial connectors will appear.
Step 3: Search for “Snowflake”
- In the search bar, type Snowflake.
- You will see Snowflake Data Cloud Connector.
- Click Start Free Trial.
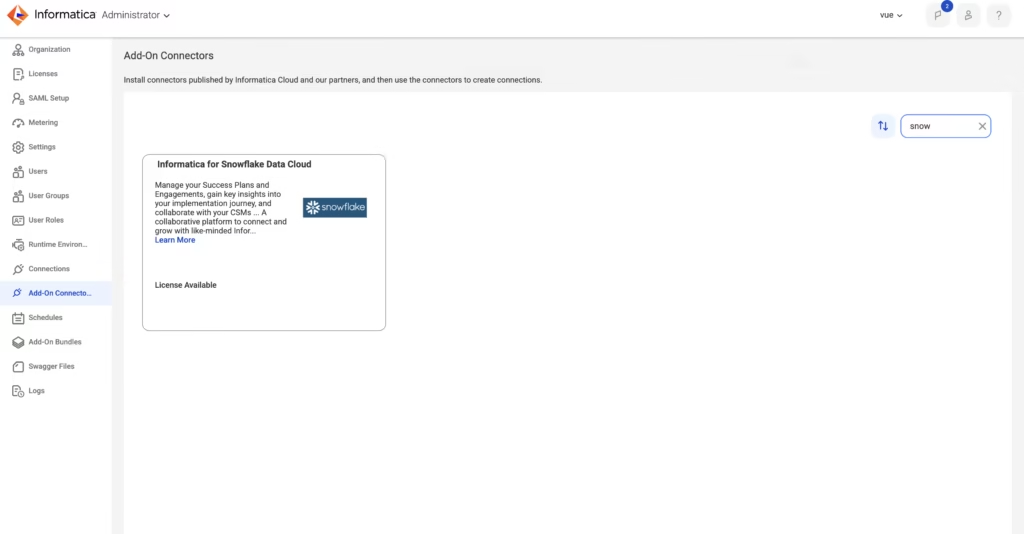
💡 If you already activated the connector, the “Start Free Trial” button will NOT appear — this is normal.
Part 2: Create a New Connection in Informatica
Once the Snowflake connector is enabled, you can create the connection.
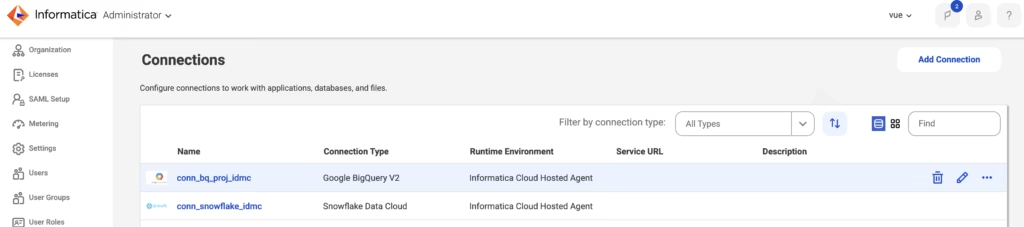
Step 4: Go to “Connections”
- From the IICS home screen, navigate to:
Explore → Connections - Click Add Connection.
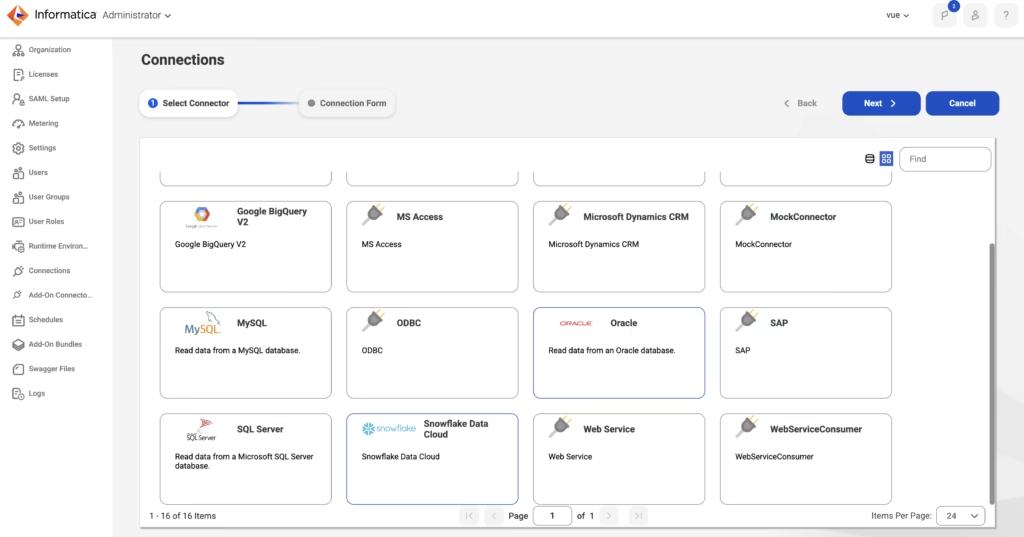
Step 5: New Connector Selection Window Appears
In the current Informatica UI, a new window appears prompting you to choose your connector before filling out details.
- Search for Snowflake Data Cloud.
- Select it.
- Click Next.
Step 6: A Connection Form Appears
Here you need to enter Snowflake Trial Account Details such as:
- Snowflake Account Name
- User Name
- Password
- Role
- Warehouse
- Database
- Schema
To fill these correctly, we need Snowflake-generated values.

Part 3: Retrieve Connection Details from Snowflake Trial
Step 7: Open Snowflake Trial Account
- Log into your Snowflake Trial dashboard.
Step 8: Go to Profile (Bottom Left Corner)
On the Snowflake UI:
- Look at the bottom-left corner.
- Click your User Profile icon.

Step 9: Click “Connect a Tool to Snowflake”
Snowflake provides preformatted connection information for ETL tools.
You will now see:
- Account Identifier
- Region
- User Name
- JDBC / URL formats
- Role
- Warehouse
- Database
- Schema
Copy these details.

Part 4: Submit Connection Details in Informatica
Step 10: Fill the Snowflake Connection Form
Paste the details from Snowflake into the following fields in Informatica:
| Informatica Field | Value From Snowflake |
|---|---|
| Account Name | Account Identifier |
| User Name | Your Snowflake Username |
| Password | Your Snowflake Password |
| Role | SYSADMIN / ACCOUNTADMIN (trial default) |
| Warehouse | COMPUTE_WH |
| Database | DEMO_DB / TRIAL_DB |
| Schema | PUBLIC |
➡️ Leave optional fields blank unless required.
Step 11: Click “Test Connection”
Informatica will attempt to connect to Snowflake.
✔ A success popup will appear:
“Connection Verified Successfully”
If it fails → check password and account URL.
Step 12: Save the Connection
This is very important.
📌 After a successful test → click Save.
Your Snowflake connection is now active inside Informatica Free Trial.
Conclusion
Setting up Salesforce, Informatica Cloud Free Trial, and Snowflake integration may seem complex at first, but with the new UI layout and connector-based flow, the process is straightforward if followed step by step.
With both connections established, you’re ready to build mappings, configure data synchronization tasks, and start creating a cloud-based data integration pipeline.
Also Read:Informatica Cloud Secure Agent ETL Informatica Cloud Secure Agent


